|
|
5 years ago | |
|---|---|---|
| .vscode | 5 years ago | |
| sdcard | 5 years ago | |
| spec | 5 years ago | |
| .busted | 5 years ago | |
| .luacheckrc | 5 years ago | |
| .travis.yml | 5 years ago | |
| LICENSE | 5 years ago | |
| README.md | 5 years ago | |
| check.sh | 5 years ago | |
| multibow.code-workspace | 5 years ago | |
| multibow.jpg | 5 years ago | |
| setup-tests.sh | 5 years ago | |
README.md
Multibow
Find it on GitHub: thediveo/multibow.
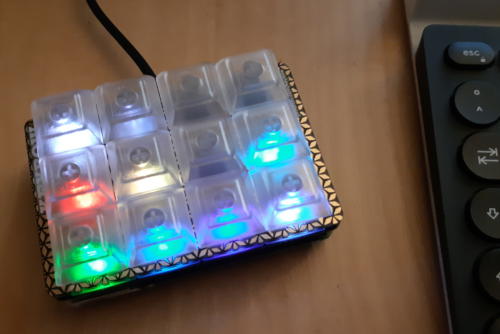
Multibow adds ease-of use support for multiple layouts to Pimoroni Keybow macro keyboards. Simply switch between the installed layouts by pressing a special key combination (defaults to press-hold key #11, then tap key #5). And you can even control the key LEDs brightness (press-hold key #11, then tap key #8 to change brightness).
"Keybows" are solderless DIY 4x3 mechanical USB keyboards, powered by a Raspberry Pi. And yes, these days even keyboards now run Linux and script interpreters...
And yes, this is probably a New Year's project slightly gone overboard ... what sane reason is there to end up with a Lua-scripted multi-layout keyboard "operating" system and a bunch of automated unit test cases?
Installation
-
Download the Pibow firmware and copy all files inside its
sdcard/subdirectory onto an empty, FAT32 formatted microSD card. Copy only the files insidesdcard/, but do not place them into asdcard -
Download all files from the
sdcard/subdirectory of this repository and then copy them onto the microSD card. This will overwrite but one filekey.lua, all other files are new.- download recent stable sdcard.zip – courtesy of Minhas Kamal's incredibly useful DownGit service which lets users directly download GitHub repository directories as .zip files. Please note that we're not responsible for the DownGit service and its integrity, so be cautious when downloading files.
Multiple Keyboard Layouts
To enable one or more multibow keyboard layouts, edit sdcard/keys.lua
accordingly in order to "require" them. The default configuration looks as
follows:
require "layouts/shift" -- for cycling between layouts.
require "layouts/media-player" -- indispensable media player controls.
require "layouts/vsc-golang" -- debugging Go programs in VisualStudio Code.
require "layouts/kdenlive" -- editing video using Kdenlive.
require "layouts/empty" -- empty, do-nothing layout.
You can disable a specific keyboard layout by simply putting two dashes
--in front of therequire "...", making it look like--require "...".
Layouts
The default setup activates the following macro keyboard layouts shown below.
You can switch (cycle) between them by pressing and holding key #11 (top-left key in landscape), then tapping key #5 (immediately right to #11), and finally releasing both keys.
Media Player Controls
We start with the probably indispensable media player controls keyboard layout. 'nuff said.
┌╌╌╌╌┐  ┌╌╌╌╌┐  ┌╌╌╌╌┐  ┌╌╌╌╌┐
┊ 11 ┊  ┊  8 ┊  ┊  5 ┊  ┊  2 ┊
└╌╌╌╌┘  └╌╌╌╌┘  └╌╌╌╌┘  └╌╌╌╌┘
          🔇     🔈/🔉     🔊
┌╌╌╌╌┐  ┌╌╌╌╌┐  ┌╌╌╌╌┐  ┌╌╌╌╌┐
┊ 10 ┊  ┊  7 ┊  ┊  4 ┊  ┊  1 ┊
└╌╌╌╌┘  └╌╌╌╌┘  └╌╌╌╌┘  └╌╌╌╌┘
space             ⏹️️
┌╌╌╌╌┐  ┌╌╌╌╌┐  ┌╌╌╌╌┐  ┌╌╌╌╌┐
┊  9 ┊  ┊  6 ┊  ┊  3 ┊  ┊  0 ┊
└╌╌╌╌┘  └╌╌╌╌┘  └╌╌╌╌┘  └╌╌╌╌┘
ESC       ◀️◀️      ▮▶      ▶▶
Debug Go in VisualStudio Code
Debug Go programs and packages in VisualStudio Code with its Go extension.
┌╌╌╌╌┐  ╔════╗  ╔════╗  ╔════╗
┊ 11 ┊  ║  8 ║  ║  5 ║  ║  2 ║
└╌╌╌╌┘  ╚════╝  ╚════╝  ╚════╝
        OUTPUT  DEBUG   CLOSE PANEL
╔════╗  ╔════╗  ╔════╗  ╔════╗
║ 10 ║  ║  7 ║  ║  4 ║  ║  1 ║
╚════╝  ╚════╝  ╚════╝  ╚════╝
  ▶    ⏹STOP   ↺RELOAD  TSTPKG
╔════╗  ╔════╗  ╔════╗  ╔════╗
║  9 ║  ║  6 ║  ║  3 ║  ║  0 ║
╚════╝  ╚════╝  ╚════╝  ╚════╝
  ▮▶    ⮧INTO   ⭢STEP   ⮥OUT
- ▶ starts the program without debugging.
- ▮▶ starts, continues, or pauses the program to be debugged.
- ⮧INTO steps into a function call.
- ⭢STEP steps over a line/function call.
- ⏹STOP stops debugging
- ↺RELOAD reloads the program being debugged.
- ☑TSTPKG activates the command "go: test package".
- OUTPUT opens/shows output panel.
- DEBUG opens/shows debug panel.
- CLOSE PANEL ... closes the output/debug panel.
Numpad
Regular layout
┌╌╌╌╌┐  ╔════╗  ╔════╗  ╔════╗
┊ 11 ┊  ║  8 ║  ║  5 ║  ║  2 ║
└╌╌╌╌┘  ╚════╝  ╚════╝  ╚════╝
           9       8       7
╔════╗  ╔════╗  ╔════╗  ╔════╗
║ 10 ║  ║  7 ║  ║  4 ║  ║  1 ║
╚════╝  ╚════╝  ╚════╝  ╚════╝
   0       6       5       4
╔════╗  ╔════╗  ╔════╗  ╔════╗
║  9 ║  ║  6 ║  ║  3 ║  ║  0 ║
╚════╝  ╚════╝  ╚════╝  ╚════╝
 enter     3       2       1
Shirt layout
┌╌╌╌╌┐  ╔════╗  ╔════╗  ╔════╗
┊ 11 ┊  ║  8 ║  ║  5 ║  ║  2 ║
└╌╌╌╌┘  ╚════╝  ╚════╝  ╚════╝
           +       -       =
╔════╗  ╔════╗  ╔════╗  ╔════╗
║ 10 ║  ║  7 ║  ║  4 ║  ║  1 ║
╚════╝  ╚════╝  ╚════╝  ╚════╝
   .       /       %       $
╔════╗  ╔════╗  ╔════╗  ╔════╗
║  9 ║  ║  6 ║  ║  3 ║  ║  0 ║
╚════╝  ╚════╝  ╚════╝  ╚════╝
   ,   backspace delete   ESC
Tmux
Regular layout
┌╌╌╌╌┐  ╔════╗  ╔════╗  ╔════╗
┊ 11 ┊  ║  8 ║  ║  5 ║  ║  2 ║
└╌╌╌╌┘  ╚════╝  ╚════╝  ╚════╝
        split v  move l move r
╔════╗  ╔════╗  ╔════╗  ╔════╗
║ 10 ║  ║  7 ║  ║  4 ║  ║  1 ║
╚════╝  ╚════╝  ╚════╝  ╚════╝
split h new window      move u
╔════╗  ╔════╗  ╔════╗  ╔════╗
║  9 ║  ║  6 ║  ║  3 ║  ║  0 ║
╚════╝  ╚════╝  ╚════╝  ╚════╝
exit    cycle p cycle n move d
Shirt layout (...coming soon)
┌╌╌╌╌┐  ╔════╗  ╔════╗  ╔════╗
┊ 11 ┊  ║  8 ║  ║  5 ║  ║  2 ║
└╌╌╌╌┘  ╚════╝  ╚════╝  ╚════╝

╔════╗  ╔════╗  ╔════╗  ╔════╗
║ 10 ║  ║  7 ║  ║  4 ║  ║  1 ║
╚════╝  ╚════╝  ╚════╝  ╚════╝

╔════╗  ╔════╗  ╔════╗  ╔════╗
║  9 ║  ║  6 ║  ║  3 ║  ║  0 ║
╚════╝  ╚════╝  ╚════╝  ╚════╝
SHIFT Overlay
This layout provides a SHIFT key. Only when pressed and held, two additional keys become active for controlling the brightness of the Keybow LEDs and for switching between multiple keyboard layouts.
Simply pressing and then immediately releasing the SHIFT key without pressing any of the other keys activates the SHIFT layer in other Multibow keyboard layouts that are SHIFT-aware.
NOTE: press and hold SHIFT, then use →LAYOUT and 🔆BRIGHT. The SHIFT key is always active, regardless of keyboard layout. The other keys in this layout become only active while holding SHIFT.
╔════╗  ╔╌╌╌╌╗  ╔╌╌╌╌╗  ┌╌╌╌╌┐
║ 11 ║  ┊  8 ┊  ┊  5 ┊  ┊  2 ┊
╚════╝  ╚╌╌╌╌╝  ╚╌╌╌╌╝  └╌╌╌╌┘
⇑SHIFT  →LAYOUT 🔆BRIGHT
┌╌╌╌╌┐  ┌╌╌╌╌┐  ┌╌╌╌╌┐  ┌╌╌╌╌┐
┊ 10 ┊  ┊  7 ┊  ┊  4 ┊  ┊  1 ┊
└╌╌╌╌┘  └╌╌╌╌┘  └╌╌╌╌┘  └╌╌╌╌┘

┌╌╌╌╌┐  ┌╌╌╌╌┐  ┌╌╌╌╌┐  ┌╌╌╌╌┐
┊  9 ┊  ┊  6 ┊  ┊  3 ┊  ┊  0 ┊
└╌╌╌╌┘  └╌╌╌╌┘  └╌╌╌╌┘  └╌╌╌╌┘
- press ⇑SHIFT, release ⇑SHIFT: if a keyboard layout has a SHIFT layer, then this activates and deactivates this ⇑SHIFT layer.
- press ⇑SHIFT, tap →LAYOUT, release ⇑SHIFT: switches to next keyboard layout.
- press ⇑SHIFT, tap 🔆BRIGHT, release 🔆BRIGHT: changes the keyboard LED brightness in three different brightness steps (70% → 100% → 40% → 70% → ...).
Empty
Just as its name says: an empty keyboard layout – useful if you want to have also a "no" layout with no functionality whatsoever to switch to. (This layout by courtesy of Margaret Thatcher.)
┌╌╌╌╌┐  ┌╌╌╌╌┐  ┌╌╌╌╌┐  ┌╌╌╌╌┐
┊ 11 ┊  ┊  8 ┊  ┊  7 ┊  ┊  6 ┊
└╌╌╌╌┘  └╌╌╌╌┘  └╌╌╌╌┘  └╌╌╌╌┘
┌╌╌╌╌┐  ┌╌╌╌╌┐  ┌╌╌╌╌┐  ┌╌╌╌╌┐
┊ 10 ┊  ┊  7 ┊  ┊  4 ┊  ┊  1 ┊
└╌╌╌╌┘  └╌╌╌╌┘  └╌╌╌╌┘  └╌╌╌╌┘
┌╌╌╌╌┐  ┌╌╌╌╌┐  ┌╌╌╌╌┐  ┌╌╌╌╌┐
┊  9 ┊  ┊  6 ┊  ┊  3 ┊  ┊  0 ┊
└╌╌╌╌┘  └╌╌╌╌┘  └╌╌╌╌┘  └╌╌╌╌┘
Your Own Multikey Keyboard Layout
You may want to start from our template in layouts/keymap-template.lua.
-
copy and rename the new layout file name to something more meaningful.
-
edit your new layout file and change its name which is specified in the
kmt.nameelement:km.keymap = { -- IMPORTANT: Make sure to change the keymap name to make it unique! name="my-cool-layout", -- ... } -
add key definitions for colors and handlers as necessary, see next for examples.
-
you can specify key handlers either "inline", as you can see from the example mapping for key #0:
km.keymap = {
  -- ...
  [0] = { c={r=1, g=1, b=1}, press=function() mb.tap("a") end},
}
This sets the key #0's LED color to white, and emits an "a" press everytime you tap key #0.
-
for more complex handling, you may want to use a dedicated function instead:
function km.mypress(keyno) mb.tap("a") end km.keymap = { -- ... [1] = { c={r=1, g=1, b=1}, press=km.mypress} } -
you can also do things on key releases:
km.keymap = {
  -- ...
  [2] = { c={r=1, g=1, b=1}, release=function() mb.tap("x") end},
}
-
For more details and examples, please have a look at the keyboard layouts in
layouts/vsc-golang.lua and layouts/kdenlive.lua.
Licenses
Multibow is (c) 2019 Harald Albrecht and is licensed under the MIT license, see the LICENSE file.
The file keybow.lua included from
pimoroni/keybow-firmware for
testing purposes is licensed under the MIT license, as declared by Pimoroni's
keybow-firmware GitHub repository.
Developing
Whether you want to dry-run your own keyboard layout or to hack Multibow: use
the unit tests which you can find in the spec/ subdirectory. These tests
help you in detecting syntax and logic errors early, avoiding the
rinse-and-repeat cycle with copying to microSD card, starting the Keybow
hardware, and then wondering what went wrong, without any real clue as to what
is the cause of failure.
Before your first testing, you'll need to run ./setup-tests.sh once in order
to install (on Ubuntu-based distributions) the required system distribution and
LuaRocks packages.
Afterwards, simply run ./check.sh while in the multibow repository root
directory to run all tests and linting.
If you want to just test a certain file or directory, then run busted spec/layout/kdenlive_spec.lua to unit test a specific keyboard layout
(or set of layouts) or busted spec/layout to check all layouts.